Lumiere Crochet Pattern

DISCLAIMER: This pattern and the pictures associated with it are property of One’s Creative Mind and are strictly for personal use only. You may NOT sell this pattern on any platform or use my pictures to advertise. However, please feel free to sell your finished crocheted items if you wish and/or post pictures of them on social media. Just remember to tag me or give me a mention as the pattern designer using @onescreativemind. © One’s Creative Mind 2020 Happy Second of the month! 11/06/2020 UPDATE: I have made a youtube tutorial to assist you if there are any parts of this written tutorial that you need help with. There are three parts in total, you can watch part 1 here. Today is the first crochet pattern release from my Beauty and the Beast set – Lumiere! This was a really fun pattern for me to make and also required the use of cardboard, wire and a glue gun. Once I crocheted the base, I drew around it onto a piece of cardboard, then cut it out a little smaller. I put a hole through the centre and inserted the wire (as pictured below). Use hot glue at the bottom to secure the wire to the cardboard base. You can cut out another circle and glue to the bottom to cover the wire so that it remains flat once inserted, i.e. sandwich the wire between the cardboard. It is not necessary but will make Lumiere a little bit more stable so he can stand unaided. You may also wish to add something like popcorn kernels instead of stuffing to the base to weigh him down. I made an alteration to the wiring in the arms. This is to prevent the arms from flopping down due to the weight of the candle. Instead of looping the centre wire around the arm wire (as pictured below), switch it to loop the arm wire around the centre wire. This way Lumiere’s arms will stay in position. Another alteration that I need to make is to use cream yarn for the candles. This is because when it came time to glue on Lumiere’s mouth it blended in too much and you couldn’t see it. This wasn’t such a big problem when it came to the eyes due to the other colours combined with it that prevent it from blending in too much. The last alteration that I made to Lumiere was to add 10 rows to his head. I made Lumiere’s head candle too short, so he didn’t have much of a forehead. However, this alteration is not depicted in the pictures below. The larger DK version is approximately 28cm tall.   Materials
  • 4ply yarn (I used Scheepjes Catona – 249 saffron, 101 candle light and 110 jet black)
  • 2mm crochet hook
  • Yarn needle
  • Fire retardant Fibrefill
  • White felt
  • Black felt
  • Brown felt
  • Beige/taupe felt
  • Mustard yellow felt
  • Cardboard
  • 3mm craft wire
  • Hot glue gun with glue
  • Pliers
  • Felt glue
  • Scissors
  • Pins (optional)
  • Stitch marker (optional)
Abbreviations
  • MR# – magic ring with the specified number of single crochets
  • SC – single crochet (double crochet English)
  • HDC – half double crochet (half treble crochet English)
  • INC – single crochet increase
  • hdcINC – half double crochet increase
  • #in1 – the specified number of SC in the same stitch (i.e. 3in1)
  • DEC – invisible decrease
  • BLO – back loop only
  • FLO – row is front loop only
  • *_______* X# – repeat sequence within the asterisks the specified number of times e.g. *SC, INC* x6)
  • CC – colour change
  • SS – slip stitch
  • CH – chain stitches
  • CH1T – chain 1 stitch then turn your work
  • ST/STS – stitch/stitches
  • FO – fasten off
^^NOTE: If I have to do a decrease in a BLO row, then I used the 2tog decrease method (two together) instead of the invisible decrease method.^^ THIS POST CAN ALSO BE VIEW DIRECTLY ON MY PATREON PAGE HERE.
Sorry! This part of content is hidden behind this box because it requires a higher contribution level ($8) at Patreon. Why not take this chance to increase your contribution?
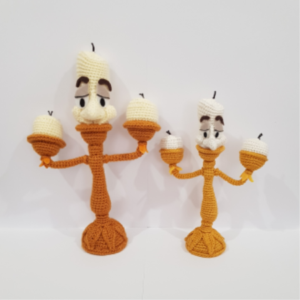
I know that there are some complicated aspects of this tutorial, but thankfully I was able to record it whilst I crocheted the second Lumiere. I just need to edit all of the footage and then you will also have a video to help guide you on any parts where you may get stuck. Until then and even after I post the tutorial video remember that I am always here and happy to offer any assistance whatsoever. Until the next post, happy crocheting! Chantelle X
Liked it? Take a second to support Chantelle on Patreon!
Become a patron at Patreon!

2 Comments

Leave a Reply

Your email address will not be published. Required fields are marked *