Happy Freebie Friday Sunday!!
My time in Cyprus is nearing the end! It’s been such an amazing two weeks and probably the first holiday that hasn’t flown by way too quickly. The only downside is that I go straight back to work the very next day 😭. Thankfully it will still be the summer holidays, so no school runs which within itself feels like being on holiday! With any luck the remainder of my “time off” will continue at it’s current pace and not make an attempt to fly by me. Let us all just keep our fingers crossed.
On a more personal note I am now engaged – eek! My future hubby got all romantic and proposed to me whilst here in Cyprus. I have never been one of those people who dream about their wedding from they were a small child. However, I can say that since being with my partner David it has been something that I think about and can picture with ease.
Also, before I get into this pattern, I apologise in advance if over the next year or two my Instagram page and blog are bombarded with wedding craft DIY 😁 I will do my best to keep it to a minimum. Before you panic I will continue to crochet and provide paid and free patterns, so any craft related posts will be an “in addition to” occurrence.
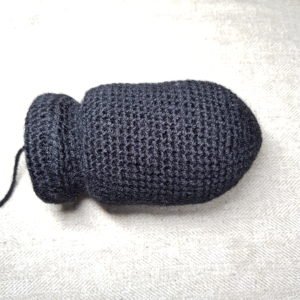
So, Bullet Bill. Despite this pattern being fairly easy, I also found it quite difficult in terms of maintaining its shape. I found that when I began to stuff Bullet Bill he would distort and lose his signature bullet shape at the back end. To tackle this problem I decided to insert 2 cardboard circles (which I annoyingly did not take pictures of). This helped maintain the shape and prevent bulging. It also helps if you don’t stuff him too firmly. When I get home I will update to include pictures showing how and where I inserted the cardboard circles.
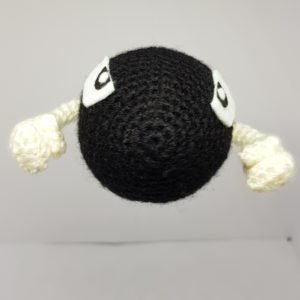
Wires were also used for his arms to make them easy to position. I did this by just inserting a wire through my stuffed and finished Bill and then folding the ends over so that the sharp end wasn’t exposed and to prevent it coming out in between the stitches.
The approximate measurements using DK yarn and 3mm hook are 2.5 inches height, 4.5 inches width and 4.75 inches length/depth.
Materials required:
- Black DK yarn
- Grey DK yarn
- White DK yarn
- Fibrefill
- 3mm hook
- Yarn needle
- Scissors
- Felt glue
- White felt
- Black felt
Abbreviations:
- MR#—MAGIC RING WITH SPECIFIED NUMBER OF SINGLE CROCHETS (E.G. MR6)
- SC—SINGLE CROCHET (DOUBLE CROCHET UK)
- INC—INCREASE
- DEC—DECREASE (I USED INVISIBLE DECREASE METHOD)
- CC—COLOUR CHANGE
- FLO—FRONT LOOP ONLY
- *_______* X# — REPEAT SEQUENCE WITHIN THE ASTERISKS THE SPECIFIED NUMBER OF TIMES (E.G. *SC, INC* X6)
- FO—FASTEN OFF
BODY
USING BLACK YARN
- MR8
- 8INC (16)
- *SC, INC* X8 (24)
- 24SC (24)
- *2SC, INC* X8 (32)
- 32SC (32)
- *3SC, INC* X8 (40)
- 40SC (40)
- *4SC, INC* X8 (48)
- *23SC, INC* X2 (50)
- 50SC (50) = 18 ROWS
- *3SC, DEC* X10 (40)
- *2SC, DEC* X10 (30)
- FLO: 30SC (30)
- 30SC (30)
- *FLO: *2SC, INC* X10 (40)
- 40SC (40)
- *3SC, INC* X10 (50)
- BLO: 50SC (50)
- 50SC (50) = 2 ROWS
- *3SC, DEC* X10 (40)
- *3SC, DEC* X8 (32)
- *2SC, DEC* X8 (24)
- *SC, DEC* X8 (16)
- 8DEC (8)
- FO
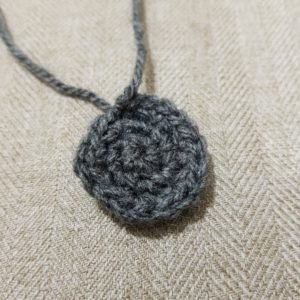
ARMHOLE (MAKE TWO)
USING GREY YARN
- MR8
- 8INC (16)
- FO
THUMB (MAKE TWO)
USING WHITE YARN
- MR4
- 4SC (4) = 3 ROWS
- FO
HAND (MAKE TWO)
USING WHITE YARN
- CH5
- *3SC, 3IN1* X2 (12)
- 12SC (12) = 3 ROWS, AT END OF 3RD ROW. 4SC AROUND Thumb (16)
- 4SC, DEC, 4SC, 3DEC (12)
- 12SC (12)
- 6DEC (6)
- 6SC (6) = 5 ROWS
- FO
ASSEMBLY
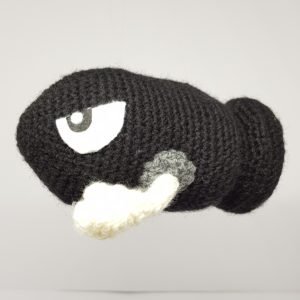
Once you have crocheted all the parts, use the pictures above to assemble your Bullet Bill. Insert a wire through the body then attach the armholes with the wire going through the middle. Afterwards, I placed the arms onto the wire and securely whip stitched it to the armhole (using a wire is optional, not a must). Stitch the thumb down so that the hand creates a fist. Using the black and white felt I cut out the necessary shapes and glued on the eyes as pictured above.
Thank you so much for checking out my website. My available content is steadily growing – as are my ideas for future projects. I hope that you find all my patterns easy to follow. I know that they are not very detailed but that’s why they are free patterns. Any current and future paid patterns available in my Etsy store are/will be very detailed PDF’s.
Thank you and until next week – Happy crocheting!
Chantelle X


I’m having a hard time figuring how to do the hand.
You say chain5, then 3sc,3in1 x2=12. Does that mean I do 3sc,3in1 on one side of the chain, then again on the other side to make a round of 12?
Yes that is correct. You crochet into both sides of the chain